You can use customer/vendor import function to add more than one customer/vendor at once.
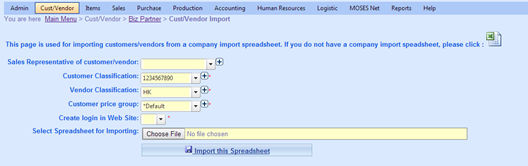
Please follow the format of Excel system provided, the definition of fields are as below:
Field Name |
Description |
IsCustomer |
Fill in "Y" for Customer, otherwise fill in "N" |
CustomerNum |
Fill in Customer number if you have; or just leave it blank, system will generate a new customer number for each customer. |
IsVendor |
Fill in "Y" for Vendor, otherwise fill in "N" |
VendorAccessCode |
Fill in a short code for your vendor |
CompanyName |
The name of your customer |
WebSite |
Customer's website |
AddressCode |
Fill in a short name for address, e.g. office, shop, warehouse, etc. |
Address |
Customer's address |
City |
City of the address |
State |
State of the address |
PostalCode |
Postal Code of the address |
Country |
Country of the address |
Phone |
Contact number |
Phone 2 |
Contact number 2 |
Fax |
Fax number |
ContactFirstName |
First Name of Contact person |
ContactLastName |
Last Name of Contact person |
Department |
Department of Contact person |
Position |
Position of Contact person |
Sex |
Sex of Contact person |
Email of Contact person |
|
CreditTermDays |
The days of credit term you provided to the customer |
CreditLimit |
The amount of Credit Limit you provided to the customer |
Price Group |
Specify the Customer Price Group, if leave it blank, MOSES will use the Customer Price Group as the one you chose while importing |
Remark |
Remark on Customer |
Login Name |
Customer Login Name for MOSES Net |
Login Password |
Customer Login Password for MOSES Net |